Authentication for Minecraft
This article contains the information on authentication in Minecraft launchers and servers using the Ely.by authorization service.
The authentication protocol is implemented as similar as possible to the original Mojang authentication protocol, but nevertheless this documentation describes all available functions specifically of the Ely.by authentication service.
General Provisions
All requests must be made at URL https://authserver.ely.by.
If the request is successful, the server will return a response with status code 200. Any other code indicates an error.
The server always responds with JSON data, except for system errors and responses to legacy requests. Take this into account to display the correct error message to the user.
In the case of a standard error, you will receive the following data:
{
    "error": "Краткое описание ошибки",
    "errorMessage": "Более длинное описание ошибки на английском языке, пригодное для отображения пользователю."
}
Expected errors
In contrast to the original protocol, a smaller range of errors is used in Ely:
Error |
Reason |
Solution |
|---|---|---|
IllegalArgumentException |
You passed an incomplete list of data to execute the request. |
Carefully double-check what you send in the request and what is in the documentation. |
ForbiddenOperationException |
User entered/developer sent incorrect values. |
You need to display a notification to the user about incorrectly entered data. |
A 404 status response is used to indicate a Not Found error.
Authentication in the launcher
This section describes authentication for the game launcher and describes the steps required to obtain an accessToken for the Minecraft game client. The authentication will result in a JWT token with minecraft_server_session access rights being received.
Attention
We recommend using the OAuth 2.0 authentication protocol and requesting minecraft_server_session access rights as that is a more secure and user-friendly method.
-
POST /auth/authenticate Direct authentication of the user using their login (username or E-mail), password and two-factor authentication token.
- Parameters
username (string) – User’s nickname or their E-mail (preferable).
password (string) – User’s password or
password:tokencombination.clientToken (string) – A unique token of the user’s launcher.
requestUser (bool) – If the field is passed as
true, theuserfield will be present in the server response.
The Ely.by accounts system supports additional user security with two-factor authentication. The Mojang’s authentication protocol doesn’t provide the possibility to pass TOTP tokens. To solve this problem and maintain compatibility with Yggdrasil’s server implementation, we suggest passing the token in the
passwordfield aspassword:token.Unfortunately, not all users are aware of this feature, so it would be better to explicitly request the user’s token and concatenate it in the code when receiving an error about the user’s account being protected by two-factor authentication.
The logic is as follows:
If the user has provided a valid username and password, but two-factor authentication is enabled for their account, you will receive a response with a
401status and the following content:{ "error": "ForbiddenOperationException", "errorMessage": "Account protected with two factor auth." }
Upon receiving this error, you should ask the user to enter a TOTP token, and then repeat the authentication request with the same credentials, adding a postfix to the password in the form
:token, wheretokenis the value entered by the user.If the user’s password was “password123” and the token was “123456”, the
passwordfield value will become “password123:123456” after concatenating.If as a result of these actions you get a response with
401status anderrorMessage“Invalid credentials. Invalid email or password.”, it will indicate that the token passed is incorrect and must be re-requested from the user.
If all data is passed correctly, you will receive the following response:
{
    "accessToken": "Длинная_строка_содержащая_access_token",
    "clientToken": "Переданный_в_запросе_client_token",
    "availableProfiles": [
        {
            "id": "UUID_пользователя_без_дефисов",
            "name": "Текущий_username_пользователя"
        }
    ],
    "selectedProfile": {
        "id": "UUID_пользователя_без_дефисов",
        "name": "Текущий_username_пользователя"
    },
    "user": { /* Только если передан параметр requestUser */
        "id": "UUID_пользователя_без_дефисов",
        "username": "Текущий_username_пользователя",
        "properties": [
            {
                "name": "preferredLanguage",
                "value": "ru"
            }
        ]
    }
}
-
POST /auth/refresh Updates a valid
accessToken. This request allows you to store not the client’s password, but only the savedaccessTokenvalue for an almost infinite ability to pass authentication.- Parameters
accessToken (string) – A unique key obtained after authentication.
clientToken (string) – The unique identifier of the client with respect to which the accessToken was received.
requestUser (bool) – If the field is passed as
true, theuserfield will be present in the server response.
Note
The original protocol also passes the value of
selectedProfile, but in Mojang’s implementation it doesn’t affect anything. Our authentication server implementation ignores this parameter and relies onaccessTokenandclientTokenvalues.If you receive any of the provided errors, you should re-request the user password and perform normal authentication.
Successful response:
{
    "accessToken": "Новая_длинная_строка_ содержащая_access_token",
    "clientToken": "Переданный_в_запросе_client_token",
    "selectedProfile": {
        "id": "UUID_пользователя_без_дефисов",
        "name": "Текущий_username_пользователя"
    },
    "user": { /* Только если передан параметр requestUser */
        "id": "UUID_пользователя_без_дефисов",
        "username": "Текущий_username_пользователя",
        "properties": [
            {
                "name": "preferredLanguage",
                "value": "ru"
            }
        ]
    }
}
-
POST /auth/validate This request allows you to check whether the specified accessToken is valid or not. This request does not update the token or its lifetime, but only makes sure that it is still valid.
- Parameters
accessToken (string) – The access token received after authentication.
A successful response will be an empty body. An error will result in a 400 or 401 status. Example of server response when sending an expired token:
{
    "error": "ForbiddenOperationException",
    "errorMessage": "Token expired."
}
-
POST /auth/signout This request enables the invalidation of all tokens issued to the user.
- Parameters
username (string) – User’s username or E‑mail (preferable).
password (string) – User’s password.
A successful response will be an empty body. Refer to the error field in the response body.
-
POST /auth/invalidate The request allows you to invalidate the accessToken. In case the passed token cannot be found in the token store, no error will be generated and you will receive a successful response.
Input parameters:
- Parameters
accessToken (string) – A unique key obtained after authentication.
clientToken (string) – The unique identifier of the client with respect to which the accessToken was received.
A successful response will be an empty body. Refer to the error field in the response body.
Authentication on the server
These requests are executed directly by the client and server using internal code or the authlib library (since version 1.7.2). They are only relevant if you have already authorized and run the game with a valid accessToken. You only need to replace the paths inside the game/library with the paths below.
Since you cannot directly change anything in authlib or the game, the values passed and server responses are not given here. If necessary, you can find this information yourself on the internet.
Via authlib
Important
This part of the documentation describes the requests executed via authlib in game version 1.7.2+. For older versions, see the section below.
All requests in this category are executed on the /session sublayer. Each request is preceded by the type of request to be sent.
-
POST /session/join A request to this URL is sent by the client at the time of connection to the server that has online-mode=true.
-
GET /session/hasJoined The request to this URL is sent by the server that has online-mode=true after the client tries to connect to it completes the join request. The textures will be signed with the Ely.by key.
The signature verification key can be obtained from the skins system.
Attention
In rare cases the
signatureproperty will have the valueCg==. If the signature field has such value, there is no need to verify it, because it will always be incorrect.
For older versions
Important
This part of the documentation describes requests sent by older versions of Minecraft where the Authlib library wasn’t used. These include all versions below 1.7.2.
All requests in this category are executed on the /session/legacy sublayer. Each request is preceded by the type of request to be sent.
The principle of processing these requests is the same as for authlib, the only difference is in the input parameters and return values.
-
GET /session/legacy/join A request to this URL is sent by the client at the time of connection to the server that has online-mode=true.
-
GET /session/legacy/hasJoined The request to this URL is sent by the server that has online-mode=true after the client trying to connect to it successfully completes the join request.
It is important not to forget the GET parameter ?user= at the end of both requests to get the following URLs: http://minecraft.ely.by/session/legacy/hasJoined?user=.
Single player
In essence, a single-player game is a local server created for a single player. At least it has been so since version 1.6, in which the local server mechanism was introduced.
However, the following request is relevant only for Minecraft 1.7.6+, when Authlib started to be used for loading skins.
-
GET /session/profile/{uuid} A request to this URL is sent by the client in a single-player game on a local server (created through the game itself). The UUID of the user with whom the client was launched is passed to the URL, and the response is information about the player’s textures in the same format as the hasJoined request.
Prebuilt Authlib libraries
Attention
Ely.by supports the authlib-injector library. This is the simplest and most universal way to install the authentication system in the game and its servers. For details, see :doc:` the corresponding documentation section <authlib-injector>`.
Since manual implementation has difficulties in finding sources, connecting dependencies and finally compiling the result, on the download page of our skin system you can download pre-built libraries with all necessary modifications. Select the desired version from the drop-down list and follow the installation instructions on the same page below.
In earlier versions of the game, the skin system was inside the game client, so the libraries below only provide authentication:
Minecraft 1.7.5 -
authlib 1.3.1Minecraft 1.7.2 -
authlib 1.3
To install, you need to replace the original library located at <Minecraft installation directory>/libraries/com/mojang/authlib/. Make sure that the versions of the already present and replacement files match.
Installing Authlib on a server
The server also uses authlib to perform player authentication, so the appropriate changes should be applied to it as well. Below are instructions on how to install authlib for different Minecraft server implementations.
Note
If none of the instructions below work for your server implementation, please create a new issue and we will append the instructions for your server.
Vanilla server
Use an archiver to open the server file minecraft_server.VERSION.jar. In the same way, open the archive with authlib for the corresponding server version. You will see two windows in front of you: one with the server files, the other with the authlib files. You need to “drag and drop” all files and folders from the authlib archive, except for the META-INF directory, and confirm the replacement.
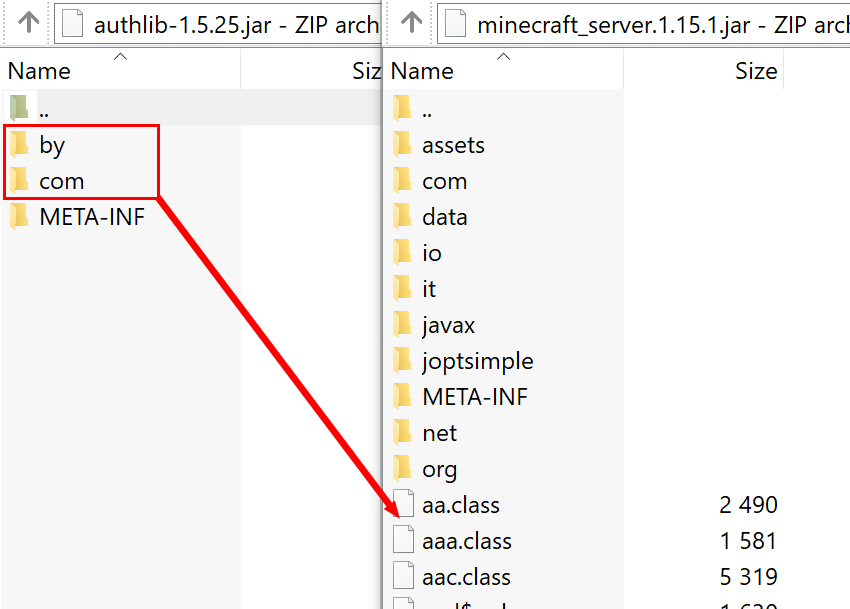
Please note: you should “drag and drop” the content below the server folders (into the .class file area).
After these steps, you can close both windows and set online-mode=true in the server.properties file.
Bukkit/Spigot
First perform the installation as described for the original server. Then download the libraries commons-io and commons-lang3, and then move the contents of the downloaded archives into the server files in the same way as authlib.
Forge/Sponge
Before performing the installation, it is necessary to determine which file is to be modified:
>=1.16:
`libraries/net/minecraft/server/VERSION-DIGITS/server-VERSION-DIGITS-extra.jar.1.13-1.15:
`libraries/net/minecraft/server/VERSION/server-VERSION-extra.jar.<=1.12:
minecraft_server.VERSION.jar.
When the required file is found, perform an authlib installation for it, similar to original server.
Paper (PaperSpigot)
Installation is done similarly to Bukkit/Spigot <#bukkit-spigot>`_ into the ``cache/patched-VERSION.jar file. After making changes, the server must be started via the jar file from the cache directory, because otherwise Paper will restore the original state of the file:
java -jar paper-VERSION-BUILD.jarjava -jar cache/patched-VERSION.jarBungeeCord
Hint
You can use the authlib-injector library to install the authentication system without modifying the server internals.
Although BungeeCord is a proxy server, it performs player authentication on its own. Unfortunately, BungeeCord does not rely on Authlib, but implements the authentication process by itself, so you will need to modify the compiled .class files to install the Ely.by authentication system.
Follow the instructions below to install:
Download the InClassTranslator program (we don’t give direct links, but it’s easy to find).
Use an archiver to open the
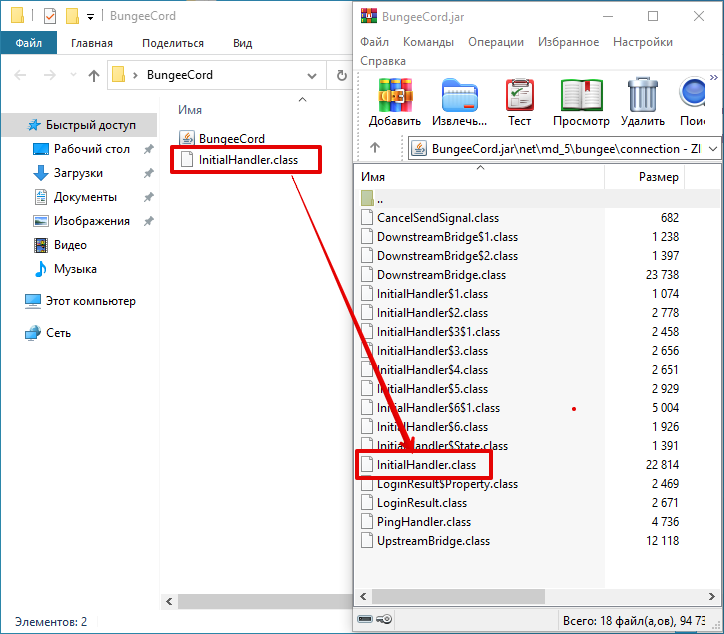
BungeeCord.jarfile.Go to the path
net/md_5/bungee/connectionand find there the fileInitialHandler.class(without any $ symbols).Unpack this file. In the simplest case you can do it by simply “pulling” it out of the archiver window.
Open the extracted file in the InClassTranslator program and replace the line
https://sessionserver.mojang.com/session/minecraft/hasJoined?username=withhttps://authserver.ely.by/session/hasJoined?username=as shown in the figure below: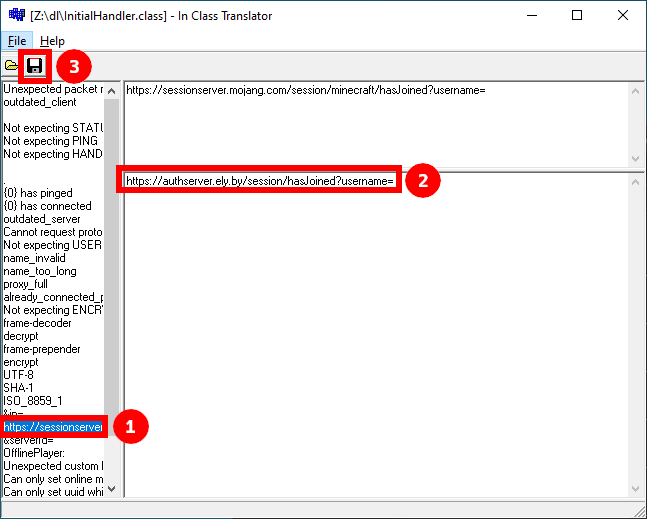
Save the changes and drag the modified file back into the server archive. Confirm the replacement.
After performing these steps, you can specify the value online_mode=true in the BungeeCord configuration file (config.yml).
Important
We also recommend performing an Authlib installation on all servers behind BungeeCord. This may be necessary for plugins that use the Mojang API. Instructions for installing on proxied servers are given above.
All servers must have online-mode=false in their configuration (server.properties), since users are already authorized by BungeeCord.
Installation on versions below 1.7.2
For older versions there are quite a large variety of different cases, and it is not possible to cover them in this documentation. The whole setup consists of replacing certain strings in certain classes via InClassTranslator.
There is a great post on the RuBukkit forum, which contains all the necessary information on class names on different versions of Minecraft. There is no point in retyping it here, so just go to its page and find the right version.
RuBukkit - Список классов и клиентов для MCP.
Installation example
Suppose you want to install authentication on a server with version 1.5.2.
First you follow the link above, select the version you want (1.5.2) and see the list of classes:
bdk.class - path to joinserver
jg.class - path to checkserver
Then you have to take the .jar file of the client and open it with any archiver. After that you need to find the bdk.class file. For this purpose it is convenient to use search.
Once you have found the file, you need to extract it from the archive - just drag and drop it from there to a convenient dirctory.
Next, run InClassTranslator and open this class in it. On the left will be a list of lines found in the file, which you can change. You only need to change the line responsible for the request to connect to the server:
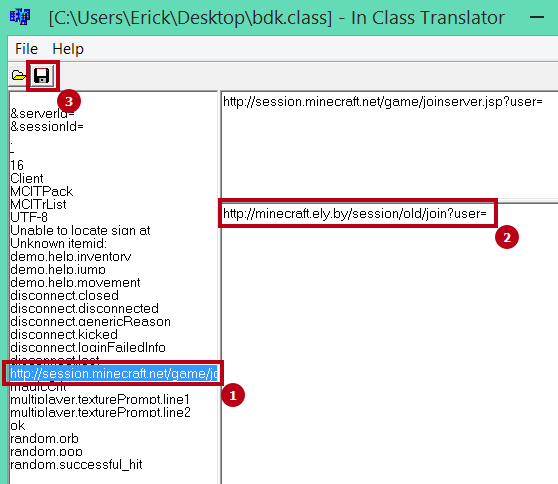
After that, you need to put the modified .class back into the game’s .jar file.
You need to perform the same operation with the server, only replace the reference with hasJoined.
After these actions you need to enable online-mode=true in the settings and the server will allow only those players who will be authorized through Ely.by.